
This is the first in a series of ‘how-to’ articles on creating an interactive Alexa Skill. The skill is called ‘Fizz Buzz Bongo’ and is available in the Alexa Skills Store. It’s a variation on the classic ‘Fizz Buzz’ programmer test, converted into an interactive game. This first article explains how to create a Java Lambda and build it using the source code provided. The second article covers how to deploy it to AWS using Terraform and the third article covers how to register the Alexa Skill in the Amazon Developer Console.
Full source code is available at https://github.com/adrianmilne/alexa-fizzbuzzbongo-skill. Click the links below to see parts 2 and 3:
- Developing an Alexa Skill: Part 1, Create Java Lambda
- Developing an Alexa Skill: Part 2, Deploying to AWS Using Terraform
- Developing an Alexa Skill: Part 3, Publishing the Skill
I plan to add more articles in future, extending this example to look at some specific AWS features – such as CloudFormation to provision the stack in place of Terraform, CodeBuild and CodePipeline to deploy automatically from GitHub, Dashboards, Custom Metrics and performance tuning. I’ll add links back to this article as they become available.
The Fizz Buzz Bongo Game
I wanted to develop a simple, yet feature rich, skill to base a series of article on (I find it helps organise my own understanding by writing articles on topics), and also exercise the interactive element of having a conversation with Alexa. I came up with a variation on the simple ‘Fizz Buzz’ programming skill test.
Fizz Buzz is a classic interview test given to programmers. They usually are tasked with writing a program that will print out the numbers from 1 to 100, substituting ‘fizz’ for multiples of 3 and ‘buzz’ for multiples of 5. The Fizz Buzz Bongo game turns this into a game – where you take turns with Alexa counting up the numbers. To add a unique element, I’ve also included substituting multiples of 8 for ‘bongo’ (and ‘fizzbongo’ for multiples of 3 and 8, ‘buzzbongo’ for 5 and 8 and ‘fizzbuzzbongo’ if you make it a multiple of 3, 5, and 8). Example Alexa phrases to get started are:
Alexa, load Fizz Buzz Bongo
Alexa, ask Fizz Buzz Bongo to start a new game
Alexa, ask Fizz Buzz Bongo to start a new game at 33
There are other ‘Fizz Buzz’ skills out there – but only one ‘Fizz Buzz Bongo’ (so far, at least…)
Building the Lambda Back End JAR
So this article is all about checking out the example code and building a Java JAR from it. That JAR can then be uploaded to AWS as a Lambda function to act as the back end for our Alexa Skill. The next article will explain how you can automate this upload process using Terraform.
You have 2 options for creating the back end code when developing an Alexa skill – create an AWS Lambda, or point it at your own existing HTTP endpoint. If you’re starting from scratch, the easiest one of these it to develop a Lambda function. These are discrete functions that are fully managed by AWS. They are ‘Serverless’ in that you don’t need to worry about provisioning, maintaining and scaling servers (of course, they still run on servers, but that’s abstracted away for you).
You also get real time monitoring out of the box. As a developer, this is great as it lets you focus more on coding the functionality and shields you from server configuration, monitoring and updating concerns. You only pay for what you use, and you get 1 million free Lambda requests a month to start with (which I’m guessing will be more than sufficient for ‘Fizz Buzz Bongo’.. ) You can build a Lambda in a number of different languages – C#, Go, Java, Node.js or Python. I’ve created this example in Java because, well, I’m primarily a Java dev. Python would have been a close second choice, but why use anything else when you can use Java ;).
Ok – so that’s the game and a brief overview of what this article is about. Now, onto the meat..
Prerequisites
In this demo we are looking at an example Java project. In order to do this you will need to check the source code out from GitHub. It’s configured as a Maven project – so if you want to compile it, run the tests and build the JAR that will get deployed to AWS, you will need Maven installed. The software you’ll need is:
- Java 8 JDK – download from Oracle
- Maven – download from the Apache Maven Project
- Java IDE (not strictly necessary if you’re happy editing code in a text editor). I use Eclipse by default – download from The Eclipse Foundation
- Git (not strictly necessary – you can download a zip file of the source code, rather than cloning the Git repository if you prefer) – this often comes bundled in your IDE, otherwise you can download from Git
Checkout Code and Build
Checkout the source code from my GitHub repo @ https://github.com/adrianmilne/alexa-fizzbuzzbongo-skill
If you’re using an IDE, import it as a Maven project.
You should be able to build the project and run the tests. I won’t go into step by step detail of how to do that here – it depends on what (if any) IDE you are using, and there are plenty of instructions out there. Get in touch with me if you have difficulties.
The Maven assembly plugin is used to build the JAR to deploy to AWS (to ensure all required dependencies are included in a single JAR file we can2 upload to AWS). If you’re using the command line – navigate to the projects root folder (the one containing pom.xml) in a terminal and type the following (if you’re using an IDE like Eclipse – create a new Maven run configuration with the following goals):
mvn clean assembly:assembly -DdescriptorId=jar-with-dependencies package
You should see the usual Maven build output in the console. It will also run the Spock Groovy Unit Tests. When it has completed, it will have created a new /target folder containing the build artefacts. The main one we are concerned with is:
alexa-fizzbuzz-demo-0.0.1-SNAPSHOT-jar-with-dependencies.jar
(Note: the version number may change depending on the current version of the code when you check it out). This is the JAR we will upload to AWS containing our Lambda code. We cover how to do this in the next article in the series – “Developing an Alexa Skill: Part 2, Deploying to AWS Using Terraform”.
For now though – lets take a look at what we’ve just built.
The Java Source Code
This application is a specific type of Lambda function. Like all Lambda functions – it requires a Handler class to act as the entry point for requests. Alexa Lambdas need to extend the com.amazon.speech.speechlet.lambda.SpeechletRequestStreamHandler from the Alexa SDK, which in turn implements the general com.amazonaws.services.lambda.runtime.RequestStreamHandler class from the Lambda SDK.
GameSpeechletRequestStreamHandler.java
In our application – our SpeechletRequestStreamHandler is com.adrianmilne.fizzbuzz.GameSpeechletRequestStreamHandler. As the code below shows this is a lightweight class, its main purpose being to load a Speechlet and register you Alexa Skills Application ID. This second point is crucial – and we will come back here at the end of Article 3.
package com.adrianmilne.fizzbuzz;

import java.util.HashSet;
import java.util.Set;

import com.amazon.speech.speechlet.lambda.SpeechletRequestStreamHandler;

/**
 * Alexa specific Handler implementation for deploying the skill as an AWS
 * Lambda.
 */
public class GameSpeechletRequestStreamHandler extends SpeechletRequestStreamHandler {

    private static final Set<String> SUPPORTED_APPLICATION_IDS = new HashSet<>();

    static {
        /*
         * NOTE: This needs to be updated with your Skill ID after you have
         * created your Alexa skill - you can find this in the Amazon Developer
         * Console - see <<BLOG POST>> for more instructions.
         */
        SUPPORTED_APPLICATION_IDS.add("INSERT_APPLICATION_ID_HERE");
    }

    public GameSpeechletRequestStreamHandler() {
        super(new GameSpeechlet(), SUPPORTED_APPLICATION_IDS);
    }
}
We have a bit of a chicken-and-egg situation here when creating Alexa Skills. When we come to create the Alexa Skill itself in Article 3 – we need to provide it with the ARN (Amazon Resource Name) of the deployed Lambda in AWS. However, we also need to deploy that Lambda with the Application ID of the Skill we have created, to allow the skill to access the Lambda. Currently, there’s no way around this other than to deploy the Lambda, use the ARN to create the skill, and then go back and add that Skill Application ID to the GameSpeechletRequestStreamHandler, build and update the Lambda.
This is the fiddliest bit of the whole process. Presumably in the future we will be able to use a provisioning tool like Terraform or CloudFormation to provision everything together (when Alexa matures a bit more). Another option is to pass in the skill id as an environment variable to the Lambda – then at least you only have to update the deployment and not recompile the code – I’ll cover this in an additional article when I enhance the codebase.
GameSpeechlet.java
The GameSpeechletRequestStreamHandler hands off to the GameSpeechlet class, where the Alexa interactions are initially processed. This class extends the com.amazon.speech.speechlet.Speechlet Alexa SDK class, which defines a number of life cycle methods.
 @Override
public SpeechletResponse onIntent(final IntentRequest request, final Session session) throws SpeechletException {
	LOG.info("onIntent requestId=[{}], sessionId=[{}]", request.getRequestId(), session.getSessionId());
	AWSXRay.beginSubsegment("Speechlet: On Intent");

	try {
		final Intent intent = request.getIntent();
		LOG.info("Intent Name=[{}]", intent.getName());

		if ("NewGameIntent".equals(intent.getName())) {
			return gameManager.getNewGameIntentResponse(intent, session);
		} else if ("FizzBuzzIntent".equals(intent.getName())) {
			return gameManager.getFizzBuzzIntentResponse(intent, session);
		} else if ("AMAZON.HelpIntent".equals(intent.getName())) {
			return gameManager.getHelpIntentResponse(session);
		} else if ("AMAZON.CancelIntent".equals(intent.getName())) {
			return gameManager.getExitIntentResponse();
		} else if ("AMAZON.StopIntent".equals(intent.getName())) {
			return gameManager.getExitIntentResponse();
		} else {
			throw new SpeechletException(format("Unrecognized intent: [%s]", intent.getName()));
		}
	} finally {
		AWSXRay.endSubsegment();
	}
}
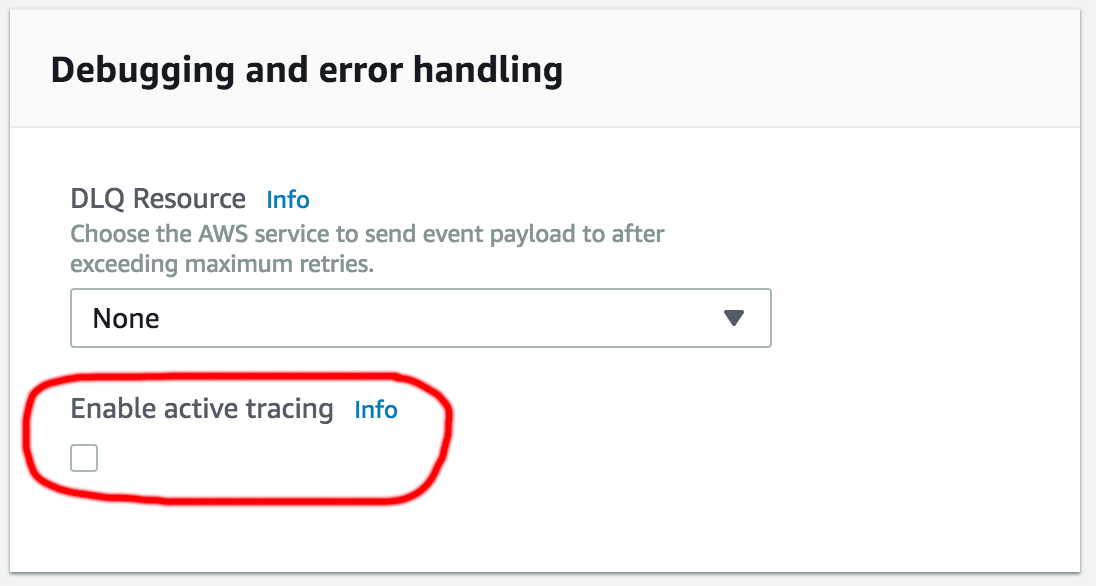
The first thing to notice here is that I’ve added in some custom XRay subsegments. You don’t need to do this – I just did it to help investigate performance. I decided to leave them in there as I’ll follow up with a future article that goes into more depth on using XRay for monitoring. XRay tracing only kicks in if the ‘Enable active tracing’ checkbox on the lambda configuration screen (under ‘Debugging and error handling’) is enabled. It should be turned off by default. If you do enable this – be aware there is a cost implication (although the first 100,000 traces a month are free). You don’t need to actually add any Java code for XRay tracing – it is enabled simply by adding the aws-xray-recorder-sdk-aws-sd aws-xray-recorder-sdk-aws-sdk-instrumentor dependencies in the pom.xml, but creating explicit sub segments like this adds a finer granularity of tracing.
The main logic of this class is contained in the ‘onIntent’ method. This class works hand-in-hand with the Alexa interaction model which we will cover in detail in Article 3. In the interaction model you define the intents and slots that allow you to map spoken words to programmable logic. The purpose of each intent should be fairly self explanatory – ‘NewGameIntent’, ‘HelpIntent’, ‘StopIntent’. Perhaps the least obvious one is the ‘FizzBuzzIntent’ – this is where we are actually playing a game – if the player speaks a number (or ‘fizz’, ‘buzz’ etc) – it will map to this Intent.
The Interaction Model
The mappings between words and intents is contained in the Interaction Model. This is all contained in a JSON file – you can see under /src/main/resources/speechAssets/interaction-model.json. You don’t need this file in your project – it is never accessed from the JAR – it is something entitrely standalone which is configured when you create the skill (covered in Article 3). Also – it doesn’t need to be a JSON file – you can build it up using GUI tools. These and the JSON file are interchangeable. I’ve kept it alongside the code for reference and completeness.
Looking at this file – the intents, again, should be faily self explanatory, matching phrases to Intents (and we can call these Intents whatever we want) – e.g. “start a new game” maps to our “NewGameIntent”. More interesting is the concept of Slots. This lets us define lists (or take advantage of predefined lists), which we can use in our Intent samples (which reduces the number of samples you need to define). It’s all pretty standard – the most unusual example here is the “FizzBuzzIntent”. We want that to accept a number, or any of our special words. To achieve this – we can define two slots that map to the Intent. One is a predefined slot ‘AMAZON.NUMBER’ – which saves us having to define a list of numbers explicitly. The other one is our own “FizzBuzz” list – that defines our special words.
GameManager.java
GameSpeechlet’s role is to interrogate the request, and then hand off to the GameManager to interrogate the Intent in more detail in the context of saved game state. In order to support an interactive game we need to maintain state between requests – each time the player responds with the next number in the sequence, we need to understand what had just been said previously to know if they are correct or not. We do this by storing state in DynamoDB. We can use the Session to identify the user (which contains the userId – which is in no way traceable to an actual real person), and then persist whatever data we need, in this case – we just need to know what the current number is. If the user selects to start a new game, the current number gets reset to 1 (or whatever numbe they choose to start from).
/**
 * Process the users response, and return the computers response.
 *
 * @param intent
 *        alexa intent
 * @param session
 *        user session
 * @return SpeechletResponse
 */
public SpeechletResponse getFizzBuzzIntentResponse(final Intent intent, final Session session) {
	LOG.info("getFizzBuzzResponse");
	final String answerKey =
			intent.getSlot(SLOT_FIZZBUZZ).getValue() == null ? intent.getSlot(SLOT_NUMBER).getValue()
					: intent.getSlot(SLOT_FIZZBUZZ).getValue();

	LOG.info("You answered [{}]", answerKey);

	final SavedGame savedGame = responseProcessor.getSavedGame(session);
	SpeechletResponse response;

	if (savedGame == null) {
		  response = responseProcessor.getNewGameAskResponse(session);
	} else if (answerKey == null) {
		  response = responseProcessor.getUnrecognisedAskResponse(savedGame);
	} else {
		 response = responseProcessor.getFizzBuzzAskResponse(session, savedGame, answerKey);
	}
	return response;
}
The GameManager hands off to the ResponseProcessor to build the detailed responses.
ResponseProcessor.java
The ResponseProcessor handles the details of what response needs to be constructed to return to the user.
/**
 * A game has started and here we are processing the users response.
 *
 * @param session
 *        user session
 * @param savedGame
 *        saved game from the database
 * @param answer
 *        user's response
 * @return SpeechletResponse
 */
public SpeechletResponse getFizzBuzzAskResponse(final Session session, final SavedGame savedGame,
		final String answer) {
	LOG.info("getFizzBuzzAskResponse");

	final GameState gameState = savedGame.getGameState();
	SpeechletResponse response;

	if (isUserStartingNewGame(gameState)) {
		if (isNumber(answer)) {
			// User is starting a new game
			savedGame.getGameState().setCurrentNumber(Integer.valueOf(answer).intValue());
			response = checkAnswerAndUpdateState(session, savedGame, answer, answer, INCREMENT_NUMBER_USER_STARTS);
		} else {
			// User started with fizz, buzz or similar - we need to bomb out
			response = getAskSpeechletResponse(TextUtils.getNonNumericStartText(),
					TextUtils.getNonNumericRepromtText());
		}
	} else {
		// A game has started, or Alexa is starting a new one
		final String expected = gameState.getNextNumberAsString();
		response =
				checkAnswerAndUpdateState(session, savedGame, expected, answer, INCREMENT_NUMBER_COMPUTER_PROMPTS);
	}

	return response;
}
The actual responses to the user are all contained inside the TextUtils class (it keeps all the responses together, and avoids polluting the main logic class).
DataManager.java
This class is called from the GameManager and encapsulates the DynamoDB access code. It makes use of a @DynamoDBTypeConverted converter to map my GameState class to JSON which is embedded in an atrribute. We’ve also got some explicit XRay tracing in here too.
/**
 * Saves the {@link SavedGame} to the database.
 *
 * @param game
 *            SaveGame
 */
public void saveGame(final SavedGame game) {
	LOG.info("saveGame [{}]", game);
	final SavedGameItem item = new SavedGameItem();
	item.setUserId(game.getSession().getUser().getUserId());
	item.setGameState(game.getGameState());
	saveItem(item);
}
FizzBuzzHelper.java
This contains the code that figures out if a number should be ‘fizz’, ‘buzz’, ‘fizzbuzz’, ‘bongo’, ‘fizzbongo’, ‘buzzbongo’, ‘fizzbuzzbongo’ or just a plain old number.
/**
 * Checks the number - if it is divisible by 3, it will return 'buzz'. If it
 * is divisible by 5 it will return 'fizz'. If it is divisible by 10 it will
 * return 'bongo'. If it is divisible by 3 and 5, it will return 'fizzbuzz',
 * by 3 and 10 it will return 'fizzbongo', by 5 and 10 it will return
 * 'buzzbongo', by 3, 5, and 10 it will return 'fizzbuzzbongo'. Otherwise it
 * will return the original number.
 *
 * @param number
 * @return 'fizz', 'buzz', 'fizzbuzz', 'fizzbongo', 'buzzbongo',
 *         'fizzbuzzbongo' or the supplied number
 */
public static String convertNumberToString(final int number) {
	if (number % FIZZ_NUMBER == 0 && number % BUZZ_NUMBER == 0 && number % BONGO_NUMBER == 0) {
		return "fizzbuzzbongo";
	} else if (number % FIZZ_NUMBER == 0 && number % BUZZ_NUMBER == 0) {
		return "fizzbuzz";
	} else if (number % FIZZ_NUMBER == 0 && number % BONGO_NUMBER == 0) {
		return "fizzbongo";
	} else if (number % BUZZ_NUMBER == 0 && number % BONGO_NUMBER == 0) {
		return "buzzbongo";
	} else if (number % FIZZ_NUMBER == 0) {
		return "fizz";
	} else if (number % BUZZ_NUMBER == 0) {
		return "buzz";
	} else if (number % BONGO_NUMBER == 0) {
		return "bongo";
	} else {
		return String.valueOf(number);
	}
}
Unit Tests
The codebase contains some Unit Tests, which use Spock and are written in Groovy. Not 100% test coverage I’m afraid (as yet anyway) – but its a start.
package com.adrianmilne.fizzbuzz.util

import spock.lang.Specification
import spock.lang.Unroll

/**
 * Unit Tests for {@link FizzBuzzHelper}.
 *
 */
class FizzBuzzHelperTest extends Specification {

    @Unroll
    def 'test fizz buzz logic: #input should be #expectedResponse'(){

        when:
        def response = FizzBuzzHelper.convertNumberToString(input)

        then:
        response == expectedResponse

        where:
        input   || expectedResponse
        1       || '1'
        2       || '2'
        3       || 'fizz'
        5       || 'buzz'
        8       || 'bongo'
        15      || 'fizzbuzz'
        16      || 'bongo'
        30      || 'fizzbuzz'
        40      || 'buzzbongo'
        120     || 'fizzbuzzbongo'
    }
}
Conclusion
So that’s a quick look over the “Fizz Buzz Bongo” Java Lambda code. You should be able to check out the code and build it as an assembly jar using Maven. The next step is then to get that deployed into AWS. You can do this manually using the AWS dashboard, or you can provision it via code using a tool such as Terraform. This is the approach which the Article 2 will walk though.
Once the Lambda is up and running in AWS – you can go ahead and create the Alexa skill. Article 3 covers this in more detail.
Hope you enjoyed it – please let me know if it was useful, or if you spot any errors/omissions.